Getting Started
Overview
Hancock provides convenient services to integrate with different DLT networks. We provide simplicity, adaptability and efficiency to develop in any DLT. Hancock can be divided into three main components:
DLT Adapter - Keep it simple. Interface to abstract from interaction with different DLT networks.
Wallet Hub - Enroute Interactions. Connect your signer wallets, or wallet service providers, to the wallet hub, that will then route any ready-to-sign transaction.
DLT Broker - Real time notifications. Provides a websocket connection that propagates any DLT event the user is subscribed to. Thus, provides an interface to easily and efficiently subscribe to blockchain asynchronous events, to avoid constant request of status.
To ease the orchestration between Hancock's services and speed up the integration with them, we are providing a set of SDKs in different languages. You can read more about this in the Hancock SDK section.
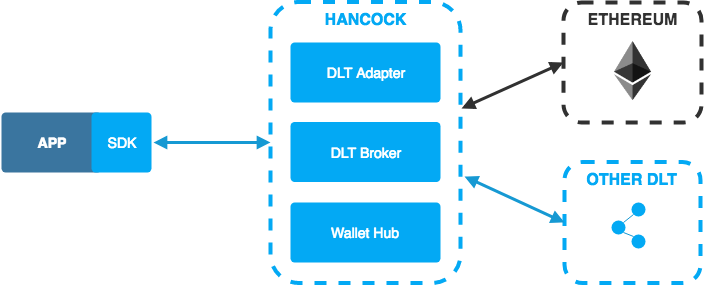
In order to comunicate with some of the supported DLTs, the application does not need to interact directly with Hancock's microservices. Instead of that, all the operations can be achieved by using a generic interface provided by the Hancock SDK.
Basic example
Let's see an example of one of the most trivial use cases that we can do using Hancock: a blockchain transaction of "transfer" type (that sends some network-native tokens from the sender account to the destination account).
To keep it simple, the application is going to sign the transaction locally, providing the private key of the account that appears as sender in the transaction. Other signature processes as delegating signature using external signature providers will be covered in detail in other sections of this guide.
Our example starts in the client application, calling the transfer method of the Hancock's nodejs SDK:
  // Instantiating the hancock nodeJs SDK
  import { HancockEthereumClient } from 'hancock-sdk';
  const hancockEthClient = new HancockEthereumClient(config);

  const sender = '0x34C54CB0d5cD1c0f5240324618adAD15ad6646AF';

  // Subscribing to transfers whose sender match with our address
  const subscription = hancockEthClient.transfers.subscribe([sender]);
  subscription.on('tx', (data) => { console.log(data) });
  subscription.on('error', (error) => { console.error(error) });

  // Sending the transfer transaction to the DLT (providing our private key)
  const result = await hancockEthClient.transfers.send(
    sender,
    '0x28a0686efb7dd9b625288a08649a6278cc4fd154',
    1000000000000000000,
    {
      privateKey: '0xd06026d5b8664036bdec0a924b8c7360566e678a2291e9440156365b040a7b83'
    }
  );
The activity flow under this interaction is the following:
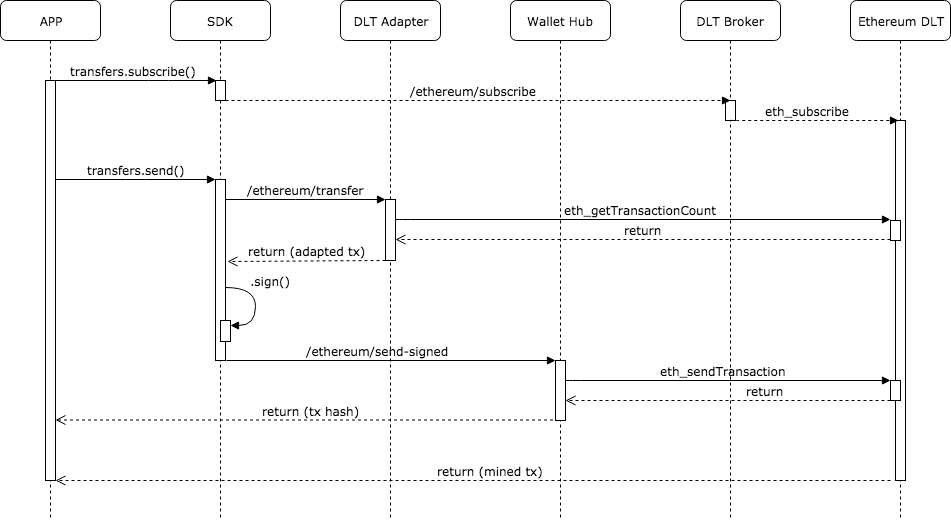
As we can see, there is a first phase in which our transfer transaction is adapted from the Hancock common transaction model to some DLT specific transaction model (in this case Ethereum's model). This process is taking place in the DLT Adapter microservice.
Once we have the transaction adapted, we need to sign it before sending it to the DLT. This proccess is done in the application memory by the SDK, so the private key never leaves the device.
After the signing process, our transaction is delivered to the DLT network through the Wallet Hub microservice.
We can receive a confirmation once our transaction is mined in some block by the subscription that we have opened using the DLT Broker microservice. Thus monitoring transactions with status sent (through our sender address).
This is just a basic example to introduce Hancock. Please keep reading this guide to explore all the possibilities that Hancock offers you for working with different DLTs faster and easier than ever.
Concepts →