Why create a new tool
APICheck is comprised of a set of tools that combined together can provide a lot of different functionalities. APICheck can not only integrate self-developed tools, but also can leverage existing tools in order to take advantage of them to provide new functionality.
Whether you wish to develop a new cool tool or integrate an already existing tool, you need to follow some steps in order to make it available in APICheck. At this point this is the document you need to read.
Tools philosophy
Packaging
Each tool in APICheck is a Docker image. This means that tools are a black box that could receive some information into its standard input and write results to the standard or error outputs. Aditionally, the return code can be used to stop the current chain.
Inside the Docker image, developers are free to install any tool they think it’s necessary.
Meta information
Every tool needs to provide some information in order to be properly managed by the Package Manager, as well as to provide information that helps users to know what the tool does. Among this information are items such as:
- Tool name
- Version
- Description
- …
Automating the integration of new tools
APICheck leverages build automation to maintain and publish the set of tools currently available. Every time a developer adds or modifies a tool (via a pull request, for example), a build process will be launched to generate a new release for the tool.
APICheck and pipelines
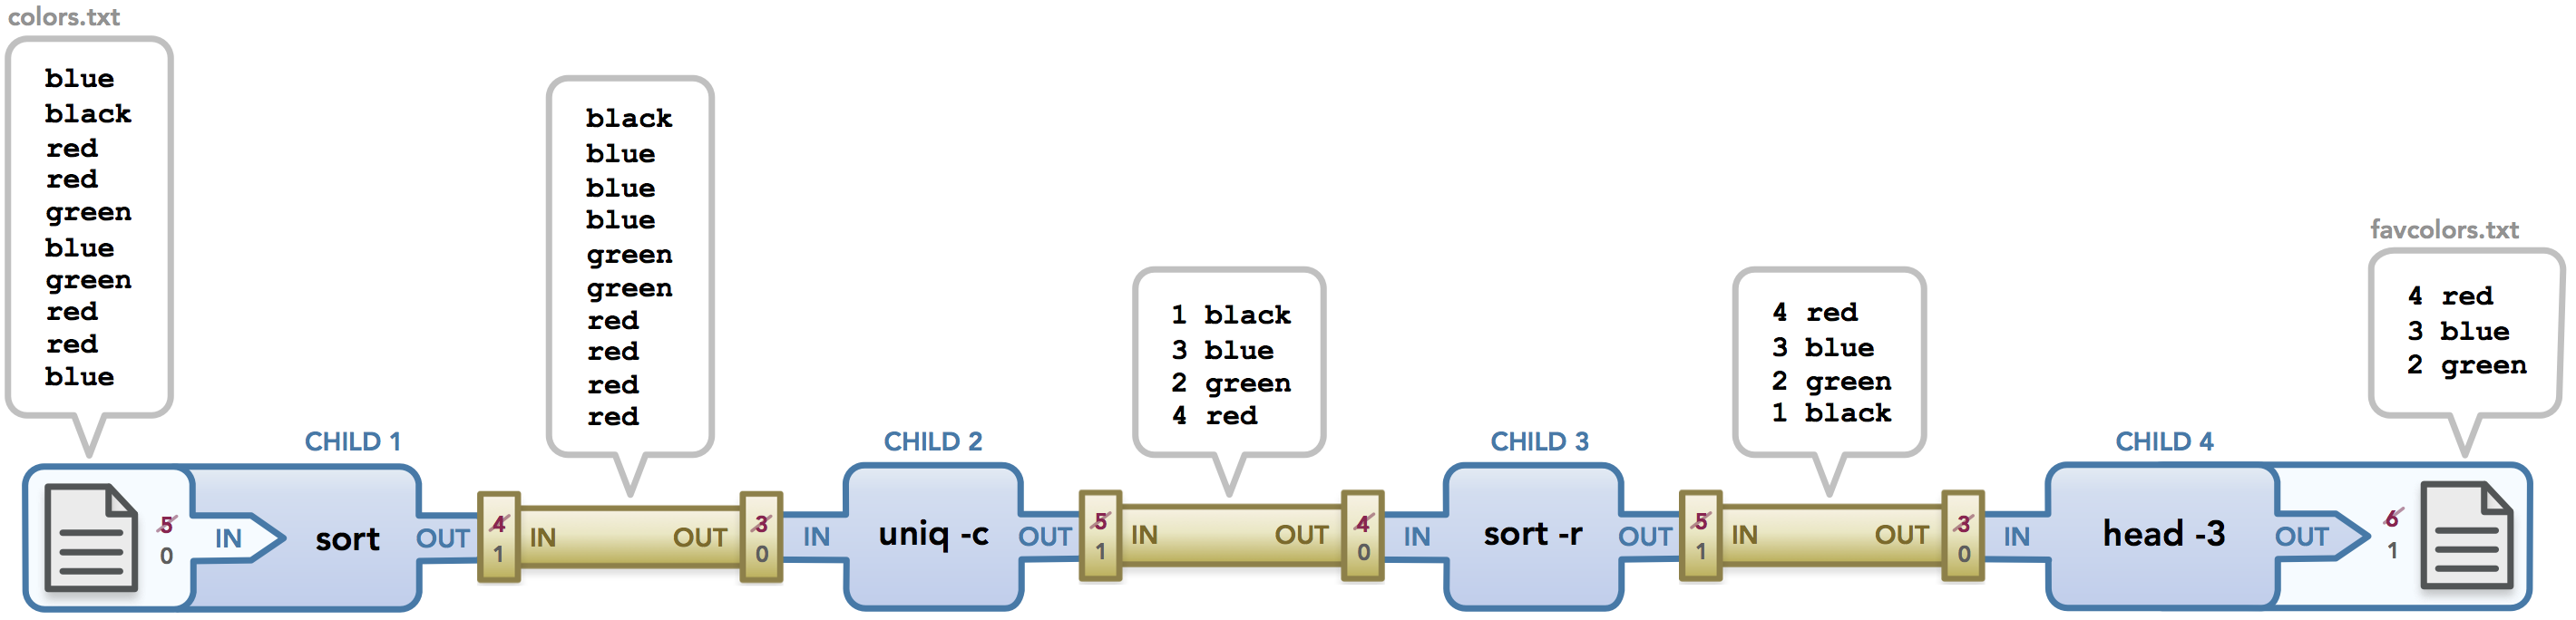
The main idea behind APICheck is to have a set of small and independent tools that can be combined to create complex tests, and this can be accomplished by borrowing the UNIX pipeline paradigm.
APICheck data format
APICheck defines a simple format for information interchange between tools. It is a JSON document with the following keys:
- request, contains data related to an HTTP request
- response, contains data related to an HTTP response
- _meta, contains data related to the process done by the tool or associated to the HTTP stream
Here is a complete example:
{
  "_meta": {
    "host": "nvd.nist.gov",
    "schema": "https",
    "tool1": {
        "custom_results": "custom results that output from tool 1"
    }
  },
  "request": {
    "url": "https://nvd.nist.gov/",
    "version": "1.1",
    "method": "get",
    "headers": {
      "User-Agent": "curl/7.54.0",
      "Accept": "*/*"
    },
    "body": "ewogICAgInVzZXJuYW1lIjogIm1lQG1lLmNvbSIsCiAgICAicGFzc3dvcmQiOiAia3NrbGFzZGYiCn0K"
  },
  "response": {
    "status": 200,
    "reason": "Ok",
    "headers": {},
    "body": "ewogICAgInVzZXJuYW1lIjogIm1lQG1lLmNvbSIsCiAgICAicGFzc3dvcmQiOiAia3NrbGFzZGYiCn0K"
  }
}
⚠ This is NOT a valid JSON file for APICheck. Check the One line format section
Important notes about data format
Flowing data through a pipeline
The information must flow through all the tools involved in the processing pipeline. Eventually, each tool can add or modify information as it is processing it.
Body encoding
The content of the body key should be encoded as base64, this way all kind of
data such as images, binary content, formatted text… could traverse de
pipeline unhindered.
This means that the tools that receive and/or produce this JSON format must decode/encode this field.
The ‘_meta’
As the information goes down through the pipeline, tools can add some metadata to the JSON document by using the _meta key. This key is a container in which tools can add information by adding their own keys.
One line JSON
The preceding examples are not directly usable as they include special characters. In order to be used in APICheck, the JSON document must be written as One JSON per line. In the above example, the document will be transformed to:
{"_meta": null, "request": {"url": "https://nvd.nist.gov/", "method": "get", "headers": {"User-Agent": "curl/7.54.0", "Accept": "*/*"}, "body": "ewogICAgInVzZXJuYW1lIjogIm1lQG1lLmNvbSIsCiAgICAicGFzc3dvcmQiOiAia3NrbGFzZGYiCn0K"}, "response": {"status": 200, "reason": "Ok", "headers": {}, "body": "ewogICAgInVzZXJuYW1lIjogIm1lQG1lLmNvbSIsCiAgICAicGFzc3dvcmQiOiAia3NrbGFzZGYiCn0K"}}
The reason for using this format is to allow data streaming. JSON was not designed for streaming so, to overcome this limitation and allow sending more than 1 data unit (or document) in a pipeline, tools reading from stdin can read line by line, obtaining each time an information unit that is whole.
Here is an example stream with 3 input data items:
$ cat 3_apicheck_data.json
{"_meta": null, "request": {"url": "https://google.com/", "method": "post", "headers": {"User-Agent": "curl/7.54.0", "Accept": "*/*"}, "body": "ewogICAgInVzZXJuYW1lIjogIm1lQG1lLmNvbSIsCiAgICAicGFzc3dvcmQiOiAia3NrbGFzZGYiCn0K"}, "response": {"status": 200, "reason": "Ok", "headers": {}, "body": "ewogICAgInVzZXJuYW1lIjogIm1lQG1lLmNvbSIsCiAgICAicGFzc3dvcmQiOiAia3NrbGFzZGYiCn0K"}}
{"_meta": null, "request": {"url": "https://www.skype.com/", "method": "head", "headers": {"User-Agent": "curl/7.54.0", "Accept": "*/*"}, "body": "ewogICAgInVzZXJuYW1lIjogIm1lQG1lLmNvbSIsCiAgICAicGFzc3dvcmQiOiAia3NrbGFzZGYiCn0K"}, "response": {"status": 200, "reason": "Ok", "headers": {}, "body": "ewogICAgInVzZXJuYW1lIjogIm1lQG1lLmNvbSIsCiAgICAicGFzc3dvcmQiOiAia3NrbGFzZGYiCn0K"}}
{"_meta": null, "request": {"url": "https://nvd.nist.gov/", "method": "get", "headers": {"User-Agent": "curl/7.54.0", "Accept": "*/*"}, "body": "ewogICAgInVzZXJuYW1lIjogIm1lQG1lLmNvbSIsCiAgICAicGFzc3dvcmQiOiAia3NrbGFzZGYiCn0K"}, "response": {"status": 200, "reason": "Ok", "headers": {}, "body": "ewogICAgInVzZXJuYW1lIjogIm1lQG1lLmNvbSIsCiAgICAicGFzc3dvcmQiOiAia3NrbGFzZGYiCn0K"}}
$ cat 3_apicheck_data.json | sensitive-json | pretty-display
Tool types
APICheck has two type of tools, depending of how it works:
- APICheck tools: understand and uses with
APICheck-dataformat. - Edge tools: useful and great tools, but don’t use
APICheck-dataformat.
APICheck tools
An APICheck tool could present some of these behaviors:
- Action: reads
APICheck-datafrom stdin (standard input). - Generator: writes
APICheck-datato stdout (standard output). - Transformer: reads
APICheck-datafrom stdin and writes a newAPICheck-datato stdout with some transformation or additional data.
Using these 3 types of tools users can identify easily how a tool works.
Edge tools
If a tool is useful but don’t handle the APICheck-data format, then it’s an
edge-tool.
Steps for creating a new tool
Well, if you got here, this means that you’re interested in how to create and publish a new tool.
To create a new tool you have to follow these steps:
Step 1 - Fork APICheck repository
This step doesn’t need more explanation :) but just in case …
Step 2 - Clone the forked repo
git clone https://github.com/${YOUR_GITHUB_USER}/apicheck
And thus finishes the easy part :)
Step 3 - Create a folder for the tool
APICheck tool
APICheck tools live in its own folder inside the /tools folder, which holds all the code and documentation. Folder names can contain numbers, lowercase letters, “_” and “-“.
cd tools/
mkdir hello-world-tool
Edge tool
Edge tools live in its own folder inside the /tools-edge folder which holds all the code and documentation. Folders names can contain numbers, lowercase letters, “_” and “-“.
cd tools-edge/
mkdir hello-world-edge-tool
Step 4 - Create the tool’s meta-information
As a convention, meta-information is stored in a file called META in the tool’s root folder. The format of this file is a key, value with an “=” symbol.
Following is a list of the metadata items, which are required unless otherwise specified.
- name: Corresponds to the tool’s name. This name will be used for the catalog, Docker image and the command name when installing the tool, so it has some restrictions: can only contains lowercase letters, numbers, “-“ and “_“. Must be unique.
- short-command (optional): some times tool name is too long. Short command is an easy-to-type alternative for invoking the tool. Once the tool is installed by the Package Manager, two commands will be created. One using the tool’s name and the other, if provided, will be the short command. Same as the name, it Must be unique.
- display-name: A friendly name for the tool to be shown in the catalog.
- version: Tool’s version. We recommend following semantic versioning, but you’re free to use your own schema.
- description: A description of your tool. Try to be descriptive. There’s not a limit for the its length, but we recommend keeping it under 150 characters.
- home: Authors can include a link for the tool home page, their profile or something else. This field is open.
- author: Author’s or team’s name.
cd tools/
cd hello-world-tool/
cat <<'EOF' > META
name = hello-world-tool
short-command = ac-hwt
version = 1.0.0
description = All good tutorials must include a Hello World example! :)
home = https://github.com/BBVA/apicheck
author = BBVA Labs Security
EOF
Step 5 - Provide the tool’s documentation
Each tool must include a documentation file. This is an important part of your tool, so we encourage you to include detailed documentation to help users use the tool. Documentation must be kept in a file called README.md inside the root folder, using Markdown format.
In order to help APICheck users, it is convenient that you provide, besides the description of your tool, some info about how it works:
- You should indicate, for example, what are the expected input (what it expects as standard input) and output (what can others expect as output and error) of your tool.
- As a best practice, your tool should return and error code of ‘0’ if it finishes without error, and any other value if it encounter any error condition. It would be great if you explain the meaning of these error codes.
- At last, you should provide some examples about your tool to help the other users to get the most of it.
cd tools/
cd hello-world-tool/
cat <<'EOF' > README.md
# [tool type image] [TOOL TITLE]

[TOOL DESCRIPTION]

# Quick start

...

# Usage

...

# Examples

...

EOF
README file must have, at least, these sections:
- TOOL TITLE
- Quick start
- Usage
- Examples
Each tool is different and doesn’t need the same documentation. Tool developer can decide the length of the doc.
⚠ Be careful with the name of the file: it must be in uppercase and the extension in lower case.
Step 6 - Include the Dockefile
As we said, each tool will be packed into a Docker Image, so we need you to
provide a Dockerfile to generate the image. The tool directory is the context
used to build the image, so if the build process generates temporary files or
you have files not to be included in the final image, please include a
.dockerignore file too in order to speed-up the build.
Only one last tip, try to maintain your image size as small as possible to make it more usable.
cd tools/
cd hello-world-tool/
cat << EOF > Dockerfile
FROM python:3.8-alpine

RUN apk update \
    && apk add --no-cache build-base
...
EOF
Step 7 - Commit and push your new plugin to GitHub
At this point we only need to commit and push the new tool to GitHub:
git add tools/hello-world-tool/
git commit -m "my first APICheck tool!"
git push
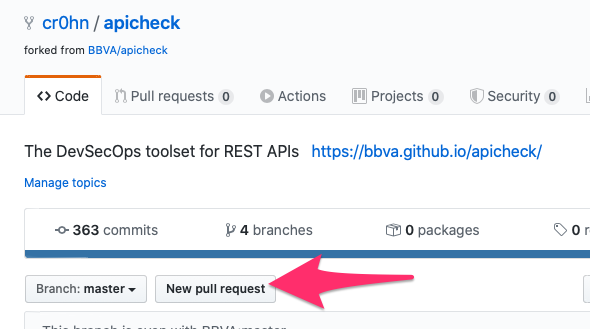
Step 8 - Send us a Pull Request
The only remaining step is to create the pull request. Here you have some documentation about Pull requests.
F.A.Q.
Do I need to develop in a specific language?
Absolutely no! You can develop in your favorite programming language, For example, some members of the APICheck team love Bash and others want to work as less as possible, so some tools were created only with a simple Bash script or even without codding any line.
In case you choose to use a specific programming language, surely, the build environment won’t have the tools needed for your language, but you can leverage multi-stage builds for building your tool.
Are there any best practices for building tools?
- Try to keep your Docker images as small as you can.
- Choose carefully your tool’s name so it doesn’t collide with an existing one in the APICheck ecosystem.
I updated my tool, but no new release was published
The building process is automated and it only fires if you modify something inside
the META file.
If you’re releasing a new tool version, be sure you update the version number
in the META file.